


By Jamie Russell, The RV Fixer
I would like to talk about seals used on your RV. There are bulb seals, sweeps for slides, door seals and hatches as well as window seals, just to name a few.
In order for these components to work their best, they need some TLC to help them maintain optimal performance to keep the water out. There are a couple of products out there that I like to use to keep all of the sweeps and seals working properly.
One product is by Magic Boss. They have a slide out lubricant protector. It helps protect against rust and helps reduce slide rail friction. This would be used on the rails that move the slide in and out to create free movement of the slide. The bulb seals and sweeps that are located on the side of the slide out and on the top of the slide out should be treated annually. The sweeps on the side of the slide are designed to keep water from entering the RV and for removing water (rain) when you bring the slide in on a rainy day. It’s important that they remain pliable in order to work properly. For example, if the sweeps are hard, it could cause the room to rack or travel out of square. This puts the timing off. Also, they could chatter down the slide as the room moves in.
To help this, Magic Boss has a rubber seal conditioner that just sprays on. It’s easy to use. It’s important to keep your slide out sweeps maintained. These products protect your sweep from UV rays as well as other elements.
The other seals we should touch on are your window seals. Although there is not much you can do to service these, you should give them a good look over before a problem happens. We are checking for cracks which allow water to get in. Also, over tightening of the window can cause the seal to compress too much and thus not be able to keep the water out. If silicone is used around the windows, check the window seals for signs of wear, cracking, peeling or lifting of the caulking. Any of these issues should be addressed.
Baggage compartment seals, entrance doors, outside kitchens and hatches – a lot of these seals use an adhesive to fasten them. Again, we will do a visual to check the condition of the seals. We will look for signs of lifting, shrinking or not reforming to original shape. If this is happening, then it might be time to replace them. For cleaning these seals you would like to use a water base cleaner and a protectant. Don’t use citrus cleaner or petroleum base products when cleaning rubber seals, as it may eat the seals and the adhesive fastening on the seals.
Replacement seals are available for many different applications. A company out of North Carolina, Steele Rubber Products, for example offers endless varieties of glue-on, peel-n-stick, press-on or push-in varieties of seals for windows, doors, slide outs, hatches, insert trim, as well as universal parts, adhesives and tools for your RV.
All of these seals are important to keeping your RV waterproof. By doing a few simple steps to keep yours working properly, you will find that it will make your RVing adventure more enjoyable. Remember that a little bit of maintenance can go a long way to help protect your RV. The right products for the right job will be available from your local RV dealer.
 Steele Rubber
Steele Rubber Products has an extensive online presence with many tutorials in written and video form to help you do your own replacements. The following is an excerpt from a video about replacing a slide out seal.
Four steps for DIY Seal Replacement
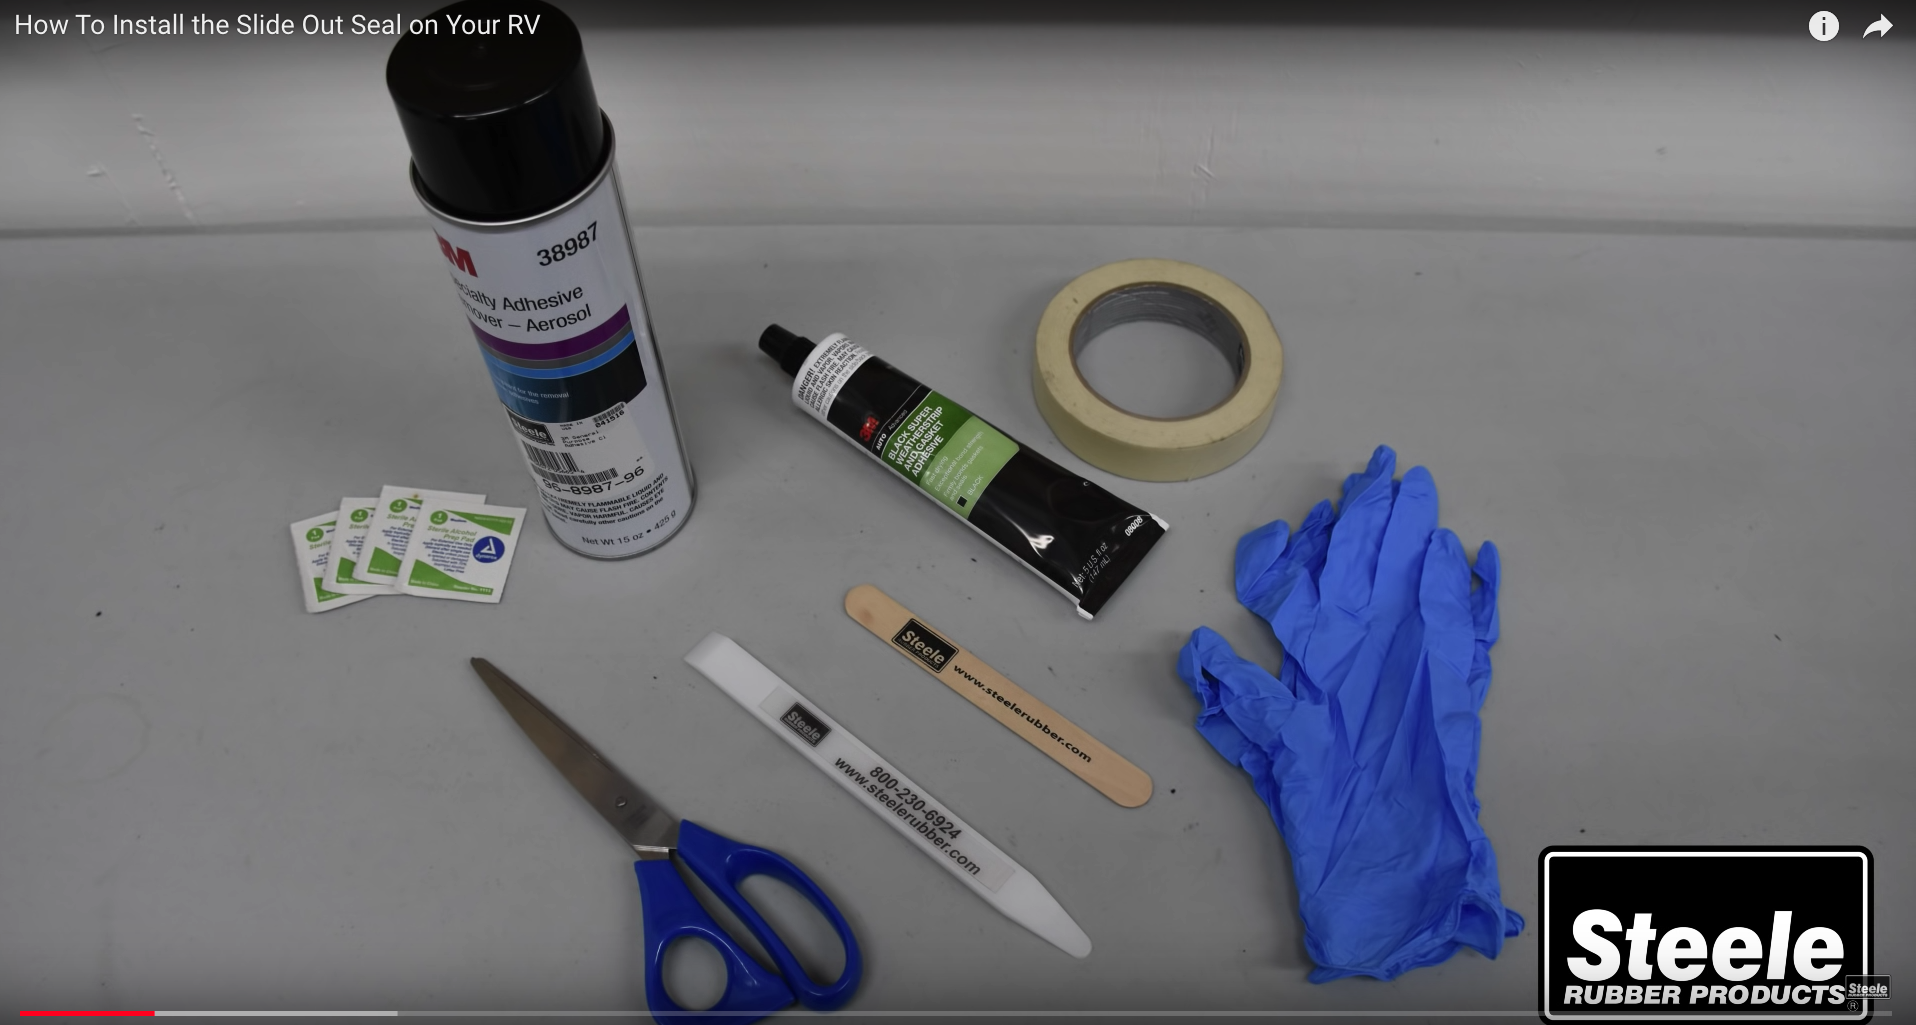
What you need:
- Adhesive Cleaner
- Adhesive (glue)
- Scraper Tool
- Popsicle stick
- Rag
- Alcohol Wipe
- Rubber Gloves
- New Rubber
Identify New Seals
RV manufacturers use a large variety of different seals, figure out what is most similar to what is on your unit. You should note anything that can be improved, for example perhaps you need a bit more lip for a better seal. Take a look in the Steele Rubber catalogue for the appropriate section (slide-out vs. window) for your seal.
Remove Old Seals
Lay masking tape along the edge of the entire old seal, this will guide you to install the rubber straight and protect from scratches and excess glue. Now remove the old seals, you may note that some old seals will have either adhesive backs or were glued but the replacement does not have to be the same.
Cleaning & Prepping
Sweep the areas around the replacement, for example on top of the slide out where there may be debris. Use an adhesive cleaner spray to break up the leftover adhesive and rubber. Then use a plastic scraper tool to take off the excess adhesive and rubber. This will leave a smooth surface to lay the new seal. Some surfaces may be difficult to completely clean, but it will be fine if there is a good surface to cling to. A final wipe with an alcohol pad will make sure there are no oils or dust to interfere with the glue. Do this to the RV and the new rubber seal.
Installing & Trimming New Seals
Apply a very thin bead of adhesive to the surface of the RV and spread it with a popsicle stick. Do the same for the rubber seal. It is important to wear gloves and to put the cap on the glue between use. Once the glue has become tacky, put a fresh thin bead on either surface and carefully place the rubber seal on the RV leaving enough on the ends for trimming. Keep applying a fresh thin bead, allow to tack-up, and apply along where you need to seal. Allowing the glue to get tacky means you don’t need to hold it in place as you go, the glue will almost immediately have a good hold. Apply it as a single length of seal in short sections. To learn about proper trimming, please go to Steele Rubber’s website and visit their Youtube channel.
https://steelerubberrv.wordpress.com/
https://www.youtube.com/user/SteeleRubberProducts


